Overview
This article describes how to create a firewall rule to Allow/Block RDP Port on the selected IP addresses.
Application Version: All EPS versions.
To create a Firewall Rule, follow the below procedure :
- Log in to the web console.
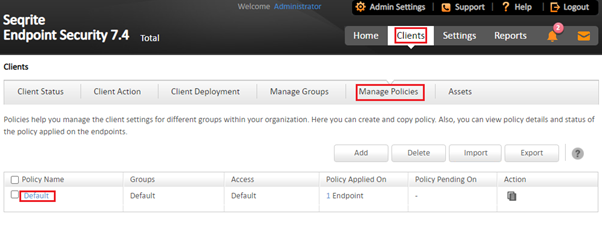
- Navigate to ‘Clients -> Manage Policy -> “Select the policy as per the requirement” (Here, Default policy is selected) -> Client settings -> Firewall’.
Note: By-default Firewall feature is OFF
- Enable Firewall
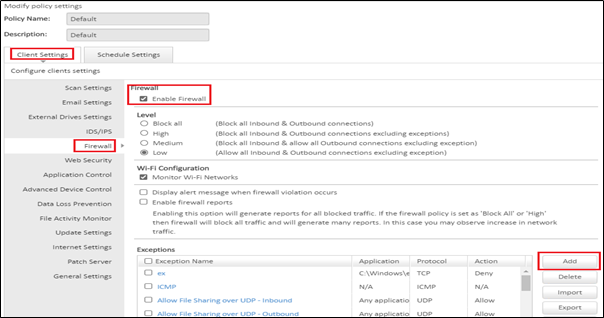
Note: By-default Firewall feature is OFF
- Under Exceptions, click “Add”.
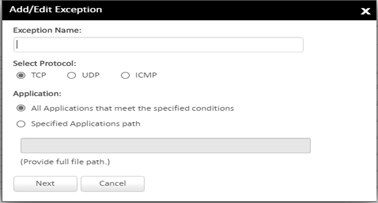
- Enter the “exception name” (E.g. RDP), Select the “Protocol” as “TCP” and select “All applications that meet the specified condition” in the “Application” option.
Note: The specific application path also can be selected if the application’s executable path is available.
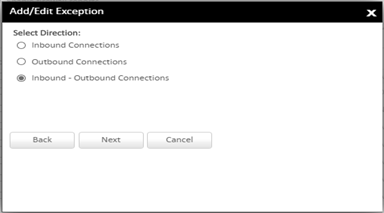
6. Select any one of the “Direction” from the following and click “Next”.
• Inbound Connections: Allow/Block Inbound Connections (For Incoming RDP connection request)
• Outbound Connections (For Outgoing RDP connection request)
• Inbound - Outbound Connections: (For both incoming and outgoing RDP connection requests
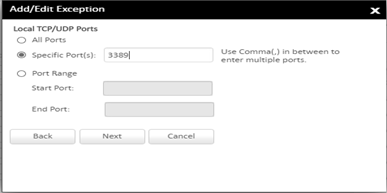
7. Under “Local TCP/UDP Ports”, select one of the following:
Select the “Specific Ports” option and enter the port number 3389 (Default RDP Port)
Note: If RDP connection is configured on other than the default port, then enter the defined port.
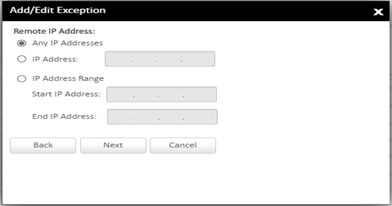
8. Click Next and select the appropriate option in the “Remote IP Address” section.
• Select the Any IP Addresses option, to allowed or blocked.
• Select the IP address option and type the IP address. Click Add to add the IP address. You can add multiple IP addresses here. You can add up to 25 IP addresses per exception. However, the combined count of all IP addresses in all exceptions in a policy must be equal to or less than 255.
• Select the IP Address Range option. Enter Start IP Address and End IP Address.
• Under Domain Name, type the Domain Name. Click Add to add the Domain Name. You can add multiple Domain Names here. You can add up to 25 Domain Names per exception. However, the combined count of all Domain Names in all exceptions in a policy must be equal to or less than 255.
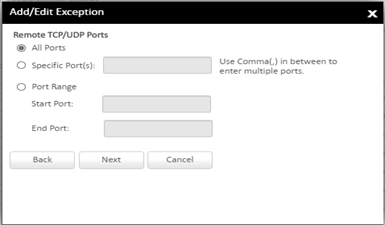
9. Under “Remote TCP/UDP Ports”, do one of the following.
• All Ports: Block/Allow communication to all remote port/ports of remote IP/IPs initiated from the local port/ports.
• Specific Port.
• Port Range.
10. Click Next and select the Allow/Deny as per the requirement to define the nature of the exception rule.
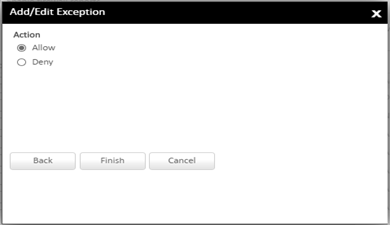
11. Click Finish and save the policy.
Notes:
• The Exception is added at the top position in the Exceptions list. The sequence of the exceptions decides the precedence of the rule. The precedence is in descending order. You can move the exception rule with the Move Up and Move Down buttons.
• UDP protocol exception rule can be added alongside TCP protocol exception rule in case any inconsistency is observed in the RDP exception rule working with TCP protocol.
• The Domain name feature is available from Seqrite EPS 7.6 onwards.
For a better understanding of the procedure find the below typical configuration for blocking the RDP.
# Scenario: Block RDP to IP address range 192.168.1.20-192.168.1.30. Here, default RDP port number is used and the exception name is “RDP”. Follow the pictures below.
